


学习使用 Adobe Premiere Pro CS6 视频编辑软件。参考书是 Adobe Premiere Pro CS6 Classroom in a Book。该软件功能强大繁多,只能是用到啥学啥,顺便就记在这里,方便以后查看。
一、利用 Photoshop 创建图像或文字 (p.400)
1 In Adobe Premiere Pro, select the Project panel, and choose File > New > Photoshop File.
2 Examine the New Photoshop File window. The video settings should be correctly set for your project.
2 Examine the New Photoshop File window. The video settings should be correctly set for your project.

3 Click OK.
4 Choose a location to store your PSD file, name it, and click Save.
5 Adobe Photoshop or Photoshop Extended opens, allowing you to edit the title.
6 Select the Text tool by pressing T.
7 Draw a text block and, by clicking and dragging, draw from the left edge of the title-safe area to the right edge. This creates a paragraph textbox to hold the text. (里层方框为文字安全区,外层方框为图像安全区)
8 Enter the text you’d like to use.
9 Adjust the font, color, and point size to taste using the controls in the Options bar across the top of the screen to adjust the font and text options. (或者用边栏上的文字Tab)
10 Click the check mark in the Options bar to commit the text layer.
9 Adjust the font, color, and point size to taste using the controls in the Options bar across the top of the screen to adjust the font and text options. (或者用边栏上的文字Tab)
10 Click the check mark in the Options bar to commit the text layer.

11 If you need transparency, be sure to disable the Background layer by clicking the visibility icon next to it in the Layers panel. You’ll see a checkerboard pattern indicating transparency.

When you’re finished in Adobe Photoshop, you can close and save the title. It will be automatically updated in the Adobe Premiere Pro project. If you’d like to return to Adobe Photoshop, just select a title in the Project panel or Timeline and choose Edit > Edit in Adobe Photoshop.
二、Photoshop 中怎样给背景图层换颜色【源文】
上面在无背景色情况下编辑很费劲,可以先暂时加一有色的背景图层,编辑完成后让此图层不可见即可。
PS 里图层菜单下新建一背景图层,F7打开图层边栏窗口,激活该背景图层,然后填充想要的颜色。鼠标点击工具栏上的前景背景色板(就是那个小白框和小黑框)弹出选颜色的对话框,选择想要的颜色后,如果想填充前景颜色就 alt+del。如果想填充背景就用 ctrl+del。
【注】 在Ps中,“背景”图层是处于锁定状态,无法对其进行编辑的。我们也可以将“背景”图层转换为普通图层 (双击“背景”图层,调出“新建图层”对话框,单击确定按钮即可解锁),然后用油漆桶进行换色。
三、视频淡入淡出 (p.156)
Original title is applying a single-sided transition (p.156)
1 The Effects panel should be docked with the Project panel. In the Effects panel, open the Video Transitions > Dissolve bin. Find the Cross Dissolve effect.
2 Drag the effect onto the start of the first video clip. You can set the effect only to Start At Cut for the first clip. The Start at Cut icon is displayed to indicate that this is a single-sided transition.
3 Drag the Cross Dissolve effect onto the end of the last video clip. You can set the effect to End At Cut for only the last clip.
四、安裝使用 Adobe 自帶的模板【源文】
When Adobe shipped Premiere Pro CS6, they left out several important files. The products included several awesome templates, presets, and more for titles, DVD menus, and animated text.
1. Adobe Premiere Pro and Encore Functional Content is available here.
2. Extract the contents of the downloaded zip
3. Navigate to the folder for the content you want to install and execute the installer.
..\CS6 Functional Content\PremierePro_6_Content_LS7\Adobe Premiere Pro CS6 Functional Content\set-up.exe
4. 装完后,可在 New Item -> Title... 点击 Template 按钮会出现 Adobe 自带的很多模板。
另外:
(Adobe After Effects is for video compositing. Adobe Premiere Pro is for video editing. Adobe Encore is for DVD authoring.)
After Effects template projects were migrated to the After Effects Exchange.
Additional animation presets for After Effects http://adobe.ly/moretext
(Adobe After Effects is for video compositing. Adobe Premiere Pro is for video editing. Adobe Encore is for DVD authoring.)
After Effects template projects were migrated to the After Effects Exchange.
Additional animation presets for After Effects http://adobe.ly/moretext
五、改变视频的长度
Changing speed and duration with the rate stretch tool (p176)
Sometimes you’ll need to find a clip that’s just the right length to fill a gap in your
Timeline. This is where the Rate Stretch tool comes in handy.

具體步驟:
1 Select the Rate Stretch tool in the Tools panel.
2 Move the Rate Stretch tool over the right edge of the first clip, and drag it until it meets the second clip.
另外:(P175)
Alternatively, you can use the Speed/Duration command (右击选中的视频) and enter a Speed of 100% to restore natural motion. 也可以填入想要的长度或速度,实现改变长度的目的。

Sometimes you’ll need to find a clip that’s just the right length to fill a gap in your
Timeline. This is where the Rate Stretch tool comes in handy.
具體步驟:
1 Select the Rate Stretch tool in the Tools panel.
2 Move the Rate Stretch tool over the right edge of the first clip, and drag it until it meets the second clip.
另外:(P175)
Alternatively, you can use the Speed/Duration command (右击选中的视频) and enter a Speed of 100% to restore natural motion. 也可以填入想要的长度或速度,实现改变长度的目的。
六、解除视频和音频的关联
Linking and unlinking audio and video clips (P143)
The link between connected video and audio segments can be switched off and on very easily. Just select the clip or clips you want to change, right-click one of them, and choose Unlink.
You can also use the Clip menu. You can link a clip with its audio again by selecting both, right-clicking one of the segments, and choosing Link.

七、使用标记
using markers (P135)
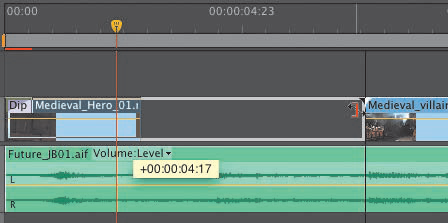
播放中可使用 M 键快速添加标记。
The Markers panel shows you a list of markers, displayed in time order. The same
panel shows you markers for a sequence or for a clip, depending on whether the
Timeline panel or the Source Monitor is active.
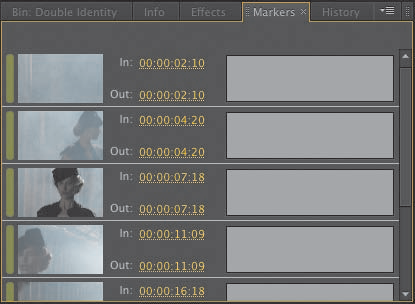
They can be based on clips or on the Timeline.
When you add a marker to a clip, it is included in the metadata for the original
media file. This means you can open the clip in another Adobe Premiere Pro project
and see the same markers.
播放中可使用 M 键快速添加标记。
The Markers panel shows you a list of markers, displayed in time order. The same
panel shows you markers for a sequence or for a clip, depending on whether the
Timeline panel or the Source Monitor is active.
They can be based on clips or on the Timeline.
When you add a marker to a clip, it is included in the metadata for the original
media file. This means you can open the clip in another Adobe Premiere Pro project
and see the same markers.
八、开始和结束点
In and out points (P114)
The In and Out points used in the Source Monitor define the part of a clip you
would like to add to a sequence.
would like to add to a sequence.
The points you use on the Timeline have two primary purposes:
• Use them to tell Adobe Premiere Pro where a clip should be positioned when it
is added to a sequence.
• Use them to select parts of a sequence you would like to remove. In
combination with the track headers, you can make very precise selections to
remove whole clips, or parts of clips, from multiple tracks.
No comments:
Post a Comment